
Currently, most tutorials for Carplay, including the official documentation, primarily implement it through SceneDelegate. According to the documentation, we define SceneDelegate and Info.plist and use SceneDelegate to provide the required CPTemplateApplicationScene for Carplay. However, if your application is a native SwiftUI application using the SwiftUI Lifecycle (SwiftUI.App), running it often results in the following error:
Thread 1: "Application does not implement CarPlay template application lifecycle methods in its scene delegate."
Even if we have correctly implemented the related methods in SceneDelegate, the error still appears, as if SceneDelegate is not in effect.
Some solutions involve not using SwiftUI.App as the @main entry point, but using AppDelegate instead.
This allows Carplay to run correctly but forces us to manage the App lifecycle using the traditional method instead of the SwiftUI lifecycle, which is not a very friendly solution for native SwiftUI developers.
An implementation example can be found at https://github.com/vanities/carplay-swiftui.
Correct Approach
After a difficult search, I found a solution in this post: https://stackoverflow.com/a/76398654/1170477.
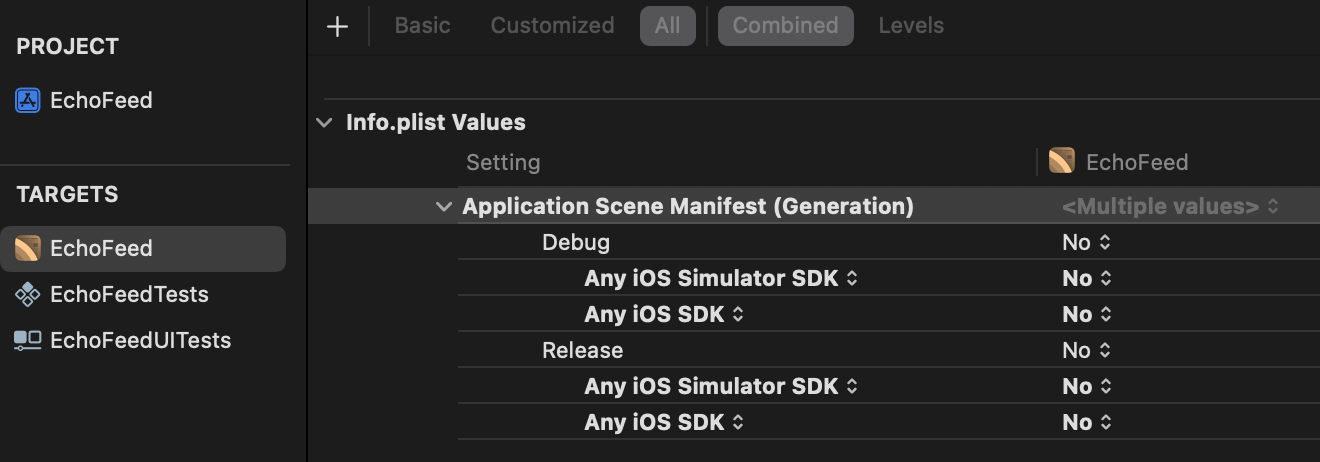
We need to disable the Application Scene Manifest (Generation) option in the project’s build settings, so the Info.plist we edit is not overridden by the automatically generated one.
Complete Integration Steps
Define UIApplicationSceneManifest in Info.plist
Insert the following configuration at the top level of Info.plist.
        <key>UIApplicationSceneManifest</key>
        <dict>
            <key>UIApplicationSupportsMultipleScenes</key>
            <false/>
            <key>UISceneConfigurations</key>
            <dict>
                <key>CPTemplateApplicationSceneSessionRoleApplication</key>
                <array>
                    <dict>
                        <key>UISceneClassName</key>
                        <string>CPTemplateApplicationScene</string>
                        <key>UISceneConfigurationName</key>
                        <string>CarPlay</string>
                        <key>UISceneDelegateClassName</key>
                        <string>$(PRODUCT_MODULE_NAME).CarPlaySceneDelegate</string>
                    </dict>
                </array>
                <key>UIWindowSceneSessionRoleApplication</key>
                <array>
                    <dict>
                        <key>UISceneClassName</key>
                        <string>UIWindowScene</string>
                        <key>UISceneConfigurationName</key>
                        <string>Phone</string>
                        <key>UISceneDelegateClassName</key>
                        <string>$(PRODUCT_MODULE_NAME).SceneDelegate</string>
                    </dict>
                </array>
            </dict>
        </dict>
If you do not use SceneDelegate for the entire application, you can also set a dedicated SceneDelegate for Carplay. The Info.plist configuration is as follows:
        <key>UIApplicationSceneManifest</key>
        <dict>
            <key>UIApplicationSupportsMultipleScenes</key>
            <false/>
            <key>UISceneConfigurations</key>
            <dict>
                <key>CPTemplateApplicationSceneSessionRoleApplication</key>
                <array>
                    <dict>
                        <key>UISceneClassName</key>
                        <string>CPTemplateApplicationScene</string>
                        <key>UISceneConfigurationName</key>
                        <string>CarPlay</string>
                        <key>UISceneDelegateClassName</key>
                        <string>$(PRODUCT_MODULE_NAME).CarPlaySceneDelegate</string>
                    </dict>
                </array>
            </dict>
        </dict>
Define CarplaySceneDelegate
Example code:
class CarPlaySceneDelegate: UIResponder, CPTemplateApplicationSceneDelegate {
    private var interfaceController: CPInterfaceController?

    /// 1. CarPlay connected
    func templateApplicationScene(
        _ templateApplicationScene: CPTemplateApplicationScene,
        didConnect interfaceController: CPInterfaceController
    ) {
        // 2
        self.interfaceController = interfaceController

        // 3
        setInformationTemplate()
    }

    /// 4. Information template
    private func setInformationTemplate() {
        // 5 - Setting the content for the template
        let sections: [CPListSection] = [
            .init(items: [
                .init(text: "Hello, CarPlay!", detailText: "This is a test app.")
            ])
        ]

        // 6 - Selecting the template
        let infoTemplate = CPListTemplate(title: "Hello World", sections: sections)

        // 7 - Setting the information template as the root template
        interfaceController?.setRootTemplate(infoTemplate,
                                             animated: true,
                                             completion: { success, error in
            if let error = error {
                debugPrint("Error: \(error)")
            }
        })
    }
}
Having defined these two parts, the Carplay template should run correctly. If it doesn’t, it might be due to incomplete Capability or other prerequisite configurations. Please refer to the official documentation.
Appendix: Example Code for SceneDelegate
class SceneDelegate: UIResponder, UIWindowSceneDelegate {

    var window: UIWindow?

    func scene(_ scene: UIScene, willConnectTo session: UISceneSession, options connectionOptions: UIScene.ConnectionOptions) {
        // Use this method to optionally configure and attach the UIWindow `window` to the provided UIWindowScene `scene`.
        // If using a storyboard, the `window` property will automatically be initialized and attached to the scene.
        // This delegate does not imply the connecting scene or session are new (see `application:configurationForConnectingSceneSession` instead).
        // Create the SwiftUI view that provides the window contents.
//        let contentView = Text("Hello World")
//
//        // Use a UIHostingController as window root view controller.
//        if let windowScene = scene as? UIWindowScene {
//            let window = UIWindow(windowScene: windowScene)
//            window.rootViewController = UIHostingController(rootView: contentView)
//            self.window = window
//            window.makeKeyAndVisible()
//        }
    }

    func sceneDidDisconnect(_ scene: UIScene) {
        // Called as the scene is being released by the system.
        // This occurs shortly after the scene enters the background, or when its session is discarded.
        // Release any resources associated with this scene that can be re-created the next time the scene connects.
        // The scene may re-connect later, as its session was not necessarily discarded (see `application:didDiscardSceneSessions` instead).
    }

    func sceneDidBecomeActive(_ scene: UIScene) {
        // Called when the scene has moved from an inactive state to an active state.
        // Use this method to restart any tasks that were paused (or not yet started) when the scene was inactive.
    }

    func sceneWillResignActive(_ scene: UIScene) {
        // Called when the scene will move from an active state to an inactive state.
        // This may occur due to temporary interruptions (ex. an incoming phone call).
    }

    func sceneWillEnterForeground(_ scene: UIScene) {
        // Called as the scene transitions from the background to the foreground.
        // Use this method to undo the changes made on entering the background.
    }

    func sceneDidEnterBackground(_ scene: UIScene) {
        // Called as the scene transitions from the foreground to the background.
        // Use this method to save data, release shared resources, and store enough scene-specific state information
        // to restore the scene back to its current state.
    }
}