
目前针对Carplay的教程,包括官方文档,主要是通过SceneDelegate来实现,按照文档我们会定义SceneDelegate和Info.plist
并通过SceneDelegate来提供Carplay所需的 CPTemplateApplicationScene, 但如果你的应用是SwiftUI原生应用,使用SwiftUI Lifecycle (SwiftUI.App), 运行后往往会产生如下报错:
Thread 1: "Application does not implement CarPlay template application lifecycle methods in its scene delegate."
即便我们已在SceneDelegate中正确实现了相关方法,但报错仍会出现,像是SceneDelegate并没有生效。
一些解决方案,涉及到不再将 SwiftUI.App 作为 @main 的入口,而是将 AppDelegate 作为入口
这虽然可以让Carplay正确运行,但会导致我们必须使用传统的方式来管理App的生命周期,而不是使用SwiftUI的生命周期,对原生SwiftUI的开发者来说,这是一个不太友好的解决方案。
这种实现方案的代码可以参考 https://github.com/vanities/carplay-swiftui
正确做法
经过艰难的搜索,我在 https://stackoverflow.com/a/76398654/1170477 这个帖子上找到了解决方案。
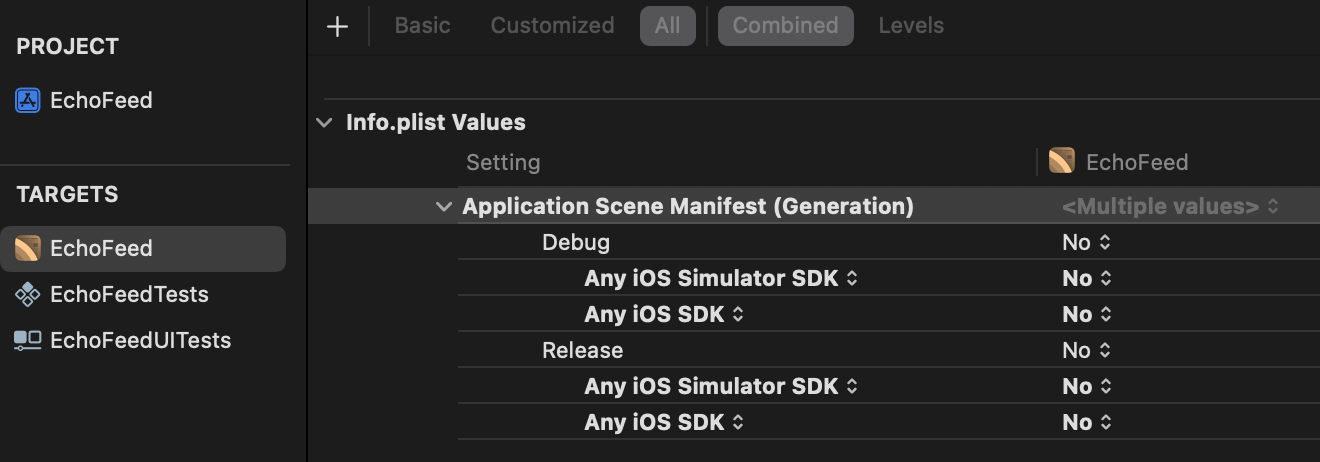
我们需要在项目的编译设置中关闭 Application Scene Manifest (Generation) 这个选项,这样我们编辑的Info.plist才不会被自动生成的所覆盖。
完整的接入步骤
在Info.plist中定义UIApplicationSceneManifest
将以下配置插入到Info.plist顶级
        <key>UIApplicationSceneManifest</key>
        <dict>
            <key>UIApplicationSupportsMultipleScenes</key>
            <false/>
            <key>UISceneConfigurations</key>
            <dict>
                <key>CPTemplateApplicationSceneSessionRoleApplication</key>
                <array>
                    <dict>
                        <key>UISceneClassName</key>
                        <string>CPTemplateApplicationScene</string>
                        <key>UISceneConfigurationName</key>
                        <string>CarPlay</string>
                        <key>UISceneDelegateClassName</key>
                        <string>$(PRODUCT_MODULE_NAME).CarPlaySceneDelegate</string>
                    </dict>
                </array>
                <key>UIWindowSceneSessionRoleApplication</key>
                <array>
                    <dict>
                        <key>UISceneClassName</key>
                        <string>UIWindowScene</string>
                        <key>UISceneConfigurationName</key>
                        <string>Phone</string>
                        <key>UISceneDelegateClassName</key>
                        <string>$(PRODUCT_MODULE_NAME).SceneDelegate</string>
                    </dict>
                </array>
            </dict>
        </dict>
如果不使用SceneDelegate,只单独为Carplay设置一个专用SceneDelegate也是可以的,Info.plist如下
        <key>UIApplicationSceneManifest</key>
        <dict>
            <key>UIApplicationSupportsMultipleScenes</key>
            <false/>
            <key>UISceneConfigurations</key>
            <dict>
                <key>CPTemplateApplicationSceneSessionRoleApplication</key>
                <array>
                    <dict>
                        <key>UISceneClassName</key>
                        <string>CPTemplateApplicationScene</string>
                        <key>UISceneConfigurationName</key>
                        <string>CarPlay</string>
                        <key>UISceneDelegateClassName</key>
                        <string>$(PRODUCT_MODULE_NAME).CarPlaySceneDelegate</string>
                    </dict>
                </array>
            </dict>
        </dict>
定义CarplaySceneDelegate
示例代码如下
class CarPlaySceneDelegate: UIResponder, CPTemplateApplicationSceneDelegate {
    private var interfaceController: CPInterfaceController?

    /// 1. CarPlay connected
    func templateApplicationScene(
        _ templateApplicationScene: CPTemplateApplicationScene,
        didConnect interfaceController: CPInterfaceController
    ) {
        // 2
        self.interfaceController = interfaceController

        // 3
        setInformationTemplate()
    }

    /// 4. Information template
    private func setInformationTemplate() {
        // 5 - Setting the content for the template
        let sections: [CPListSection] = [
            .init(items: [
                .init(text: "Hello, CarPlay!", detailText: "This is a test app.")
            ])
        ]

        // 6 - Selecting the template
        let infoTemplate = CPListTemplate(title: "Hello World", sections: sections)

        // 7 - Setting the information template as the root template
        interfaceController?.setRootTemplate(infoTemplate,
                                             animated: true,
                                             completion: { success, error in
            if let error = error {
                debugPrint("Error: \(error)")
            }
        })
    }
}
定义了这两个部分,Carplay的模板应该就已可以正常运行了,如果不能运行,可能是Capability等前置配置没有完成,请参考官方文档。
附: SceneDelegate 的示例代码
class SceneDelegate: UIResponder, UIWindowSceneDelegate {

    var window: UIWindow?

    func scene(_ scene: UIScene, willConnectTo session: UISceneSession, options connectionOptions: UIScene.ConnectionOptions) {
        // Use this method to optionally configure and attach the UIWindow `window` to the provided UIWindowScene `scene`.
        // If using a storyboard, the `window` property will automatically be initialized and attached to the scene.
        // This delegate does not imply the connecting scene or session are new (see `application:configurationForConnectingSceneSession` instead).
        // Create the SwiftUI view that provides the window contents.
//        let contentView = Text("Hello World")
//
//        // Use a UIHostingController as window root view controller.
//        if let windowScene = scene as? UIWindowScene {
//            let window = UIWindow(windowScene: windowScene)
//            window.rootViewController = UIHostingController(rootView: contentView)
//            self.window = window
//            window.makeKeyAndVisible()
//        }
    }

    func sceneDidDisconnect(_ scene: UIScene) {
        // Called as the scene is being released by the system.
        // This occurs shortly after the scene enters the background, or when its session is discarded.
        // Release any resources associated with this scene that can be re-created the next time the scene connects.
        // The scene may re-connect later, as its session was not necessarily discarded (see `application:didDiscardSceneSessions` instead).
    }

    func sceneDidBecomeActive(_ scene: UIScene) {
        // Called when the scene has moved from an inactive state to an active state.
        // Use this method to restart any tasks that were paused (or not yet started) when the scene was inactive.
    }

    func sceneWillResignActive(_ scene: UIScene) {
        // Called when the scene will move from an active state to an inactive state.
        // This may occur due to temporary interruptions (ex. an incoming phone call).
    }

    func sceneWillEnterForeground(_ scene: UIScene) {
        // Called as the scene transitions from the background to the foreground.
        // Use this method to undo the changes made on entering the background.
    }

    func sceneDidEnterBackground(_ scene: UIScene) {
        // Called as the scene transitions from the foreground to the background.
        // Use this method to save data, release shared resources, and store enough scene-specific state information
        // to restore the scene back to its current state.
    }
}